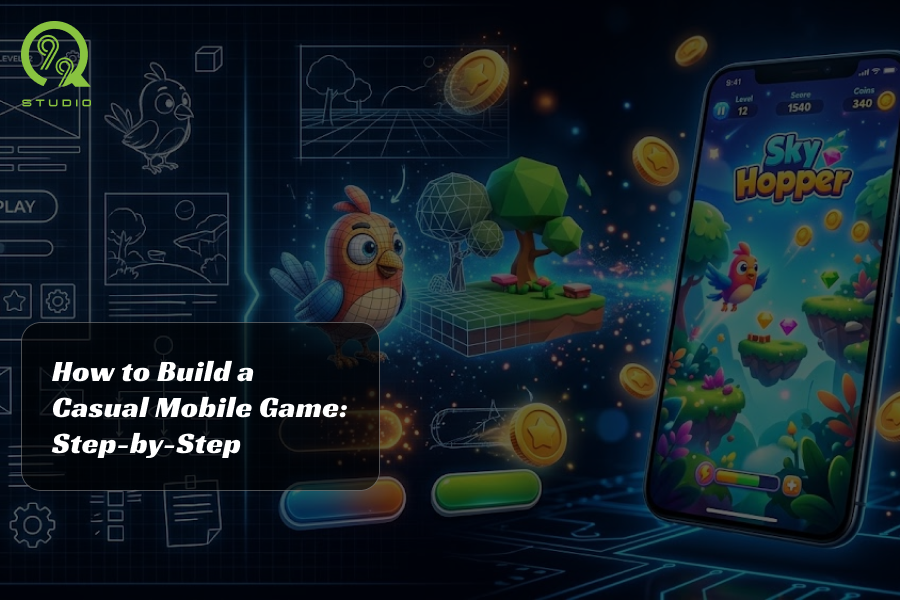
So you want to build a casual mobile game. Maybe you've got a simple but addictive idea. Maybe you've played Subway Surfers, Flappy Bird, or Stack, and thought I can make something like this.
Good news: you can. And Unity makes it more accessible than ever.
In this guide, I'll walk you through the entire process from installing Unity to publishing your first casual mobile game on Android or iOS in a way that's beginner-friendly but doesn't skip the parts that actually matter.
Who this is for: Beginners and indie devs who want to build a 2D or 3D casual mobile game using Unity, with no (or little) prior experience.
What Is a Casual Mobile Game?
A casual mobile game is a simple, easy-to-learn game designed for short play sessions, think Angry Birds, 2048, Candy Crush, or Temple Run. These games typically have:
- One-tap or swipe controls
- Fast onboarding (no tutorials needed)
- Looping or endless gameplay
- Clear win/fail states
Why Unity?
Unity is the most popular game engine for mobile game development and for good reason:
- Free to use (Unity Personal plan covers most indie devs)
- Supports both Android and iOS from one codebase
- Massive community and documentation
- Huge asset store for free/paid resources
- Used by games like Pokémon Go, Alto's Odyssey, and Among Us
Step 1: Set Up Unity for Mobile Game Development
Install Unity Hub
Head to unity.com and download Unity Hub. It's the launcher that manages your Unity versions and projects.
When choosing a Unity version, go with the latest LTS (Long Term Support) release. It's stable, well-documented, and actively supported.
Add Mobile Build Modules
During installation (or via Unity Hub → Installs → Add Modules), make sure to add:
- Android Build Support (includes Android SDK & NDK Tools, OpenJDK)
- iOS Build Support (if you're on a Mac and targeting Apple devices)
Create a New Project
- Open Unity Hub → Click New Project
- Select 2D or 3D template depending on your game type
- Name it something meaningful (e.g., TapRunner_Proto)
- Hit Create
Pro tip: For most casual games (runners, puzzles, hyper-casual), start with 2D; it's simpler and performs better on low-end devices.
Step 2: Plan Your Casual Game
This is the step most beginners skip, and why most projects die after week two.
You don't need a 20-page GDD (Game Design Document). You need answers to 5 questions:
| Question | Example Answer |
| What is the core mechanic? | Tap to jump over obstacles |
| What's the win/fail condition? | Survive as long as possible / hit an obstacle = game over |
| What's the loop? | Run → collect coins → die → retry |
| What platform? | Android first, iOS later |
| What's the visual style? | Flat 2D, minimalist |
Write this down. Refer back to it every time you feel lost.
Step 3: Design the Core Game Loop
The core loop is the heartbeat of your casual game. For a runner game, it looks like this:
START → Player runs automatically
↓
Tap to jump/dodge
↓
Collect coins/power-ups
↓
Hit obstacle → GAME OVER
↓
Show score + Retry button
↑_________________________|
In Unity, this translates to:
- A Player GameObject with a Rigidbody2D and Collider2D
- An Obstacle Spawner script that spawns objects at regular intervals
- A Score Manager that tracks distance or points
- A GameManager script that handles game states (Playing, Dead, Menu)
Step 4: Set Up Your Unity Scene
Build the Player
- Go to GameObject → 2D Object → Sprite and create your player character
- Add a Rigidbody2D component (Inspector → Add Component → Physics 2D → Rigidbody2D)
- Add a BoxCollider2D or CircleCollider2D
- Set Gravity Scale to 1 (for jump mechanics) or 0 (for top-down games)
Write Your First Player Script
Create a new C# script called PlayerController:
using UnityEngine;
public class PlayerController: MonoBehaviour
{
public float jumpForce = 10f;
private Rigidbody2D rb;
private bool isGrounded = true;
void Start()
{
rb = GetComponent<Rigidbody2D>();
}
void Update()
{
// Works for both mobile tap and PC click
if (Input.GetMouseButtonDown(0) && isGrounded)
{
rb.velocity = Vector2.up * jumpForce;
isGrounded = false;
}
}
void OnCollisionEnter2D(Collision2D col)
{
if (col.gameObject.CompareTag("Ground"))
isGrounded = true;
if (col.gameObject.CompareTag("Obstacle"))
GameManager.instance.GameOver();
}
}
This handles tap-to-jump on mobile since Input.GetMouseButtonDown(0) maps to screen taps on Android and iOS.
Step 5: Create Obstacles and Spawning Logic
Obstacle Prefab
- Create a new Sprite → Add a BoxCollider2D → Tag it as "Obstacle"
- Drag it to your Assets folder to make it a Prefab
Spawner Script
using UnityEngine;
public class ObstacleSpawner: MonoBehaviour
{
public GameObject obstaclePrefab;
public float spawnRate = 2f;
private float timer;
void Update()
{
timer += Time.deltaTime;
if (timer >= spawnRate)
{
Spawn();
timer = 0f;
spawnRate = Mathf.Max(0.5f, spawnRate - 0.05f); // Increase difficulty
}
}
void Spawn()
{
Vector3 spawnPos = new Vector3(10f, transform.position.y, 0f);
Instantiate(obstaclePrefab, spawnPos, Quaternion.identity);
}
}
Add a MoveLeft script to your obstacle prefab:
using UnityEngine;
public class MoveLeft: MonoBehaviour
{
public float speed = 5f;
void Update()
{
transform.Translate(Vector2.left * speed * Time.deltaTime);
if (transform.position.x < -15f)
Destroy(gameObject);
}
}
Step 6: Build the UI
Add a Score Counter
- GameObject → UI → Text - TextMeshPro place it top-center of the screen
- Create a ScoreManager script:
using UnityEngine;
using TMPro;
public class ScoreManager: MonoBehaviour
{
public TextMeshProUGUI scoreText;
private float score;
void Update()
{
if (GameManager.instance.isPlaying)
{
score += Time.deltaTime * 10;
scoreText.text = Mathf.FloorToInt(score).ToString();
}
}
}
Game Over Panel
- Create a UI Panel with a "Game Over" text and a Retry button
- Set it inactive by default
- Activate it inside your GameManager.GameOver() method:
public class GameManager: MonoBehaviour
{
public static GameManager instance;
public bool isPlaying = true;
public GameObject gameOverPanel;
void Awake() => instance = this;
public void GameOver()
{
isPlaying = false;
gameOverPanel.SetActive(true);
}
public void RestartGame()
{
UnityEngine.SceneManagement.SceneManager.LoadScene(0);
}
}
Step 7: Optimize for Mobile Performance
Casual games need to run smoothly on low-end Android devices. Here's how:
Graphics and Rendering
- Use Sprite Atlas to batch draw calls (Window → 2D → Sprite Atlas)
- Keep textures at 512x512 or 1024x1024 max
- Disable real-time shadows unless necessary
- Use URP (Universal Render Pipeline) for better mobile performance
Code Performance
- Avoid FindObjectOfType() inside Update() cache references in Start()
- Use Object Pooling instead of Instantiate/Destroy for obstacles (huge performance win)
- Target 60 FPS set this with: Application.targetFrameRate = 60;
Object Pooling (Basic Example)
// Instead of instantiating every time:
GameObject obj = objectPool.Dequeue();
obj.SetActive(true);
// Instead of Destroy:
obj.SetActive(false);
objectPool.Enqueue(obj);
Step 8: Add Mobile-Specific Features
Touch Controls
For swipes, use Unity's Touch API:
Vector2 startTouch, swipeDelta;
void Update()
{
if (Input.touchCount > 0)
{
Touch touch = Input.GetTouch(0);
if (touch.phase == TouchPhase.Began)
startTouch = touch.position;
else if (touch.phase == TouchPhase.Ended)
{
swipeDelta = touch.position - startTouch;
if (swipeDelta.y > 50f) Jump();
if (swipeDelta.y < -50f) Slide();
}
}
}
Screen Resolution Handling
In Canvas Settings, set:
- Canvas Scaler → UI Scale Mode: Scale With Screen Size
- Reference Resolution: 1080 x 1920
- Match: 0.5 (Width and Height)
This ensures your UI looks good on all screen sizes.
Step 9: Add Sound and Game Feel
This is what separates a boring prototype from an addictive game.
Add Sound Effects
- Import audio files (.wav or .mp3) into Assets
- Add an AudioSource component to a GameObject
- Play sounds on jump, coin collect, and game over:
public AudioClip jumpSound;
private AudioSource audioSource;
void Start() => audioSource = GetComponent<AudioSource>();
void PlayJump() => audioSource.PlayOneShot(jumpSound);
Free SFX resources: freesound.org, kenney.nl
Add Game Feel (Juice)
- Screen shake on death
- Particle effects on coin pickup
- Speed increases over time for escalating tension
- Simple player bounce animation
These micro-details make players feel the game and keep them coming back.
Step 10: Build and Export for Android / iOS
Build for Android
- Go to File → Build Settings → Select Android → Switch Platform
- Click Player Settings:
- Set your Company Name and Product Name
- Set Minimum API Level to Android 6.0 (API 23)
- Enable IL2CPP scripting backend for better performance
- Connect your Android device (enable USB Debugging)
- Click Build and Run or Build to get the .apk file
Build for iOS (Mac required)
- Switch Platform to iOS in Build Settings
- Click Build this opens an Xcode project
- Open in Xcode → Set your Apple Developer account
- Deploy to device or submit to App Store via Xcode
Step 11: Monetize Your Casual Game
Most casual games make money through:
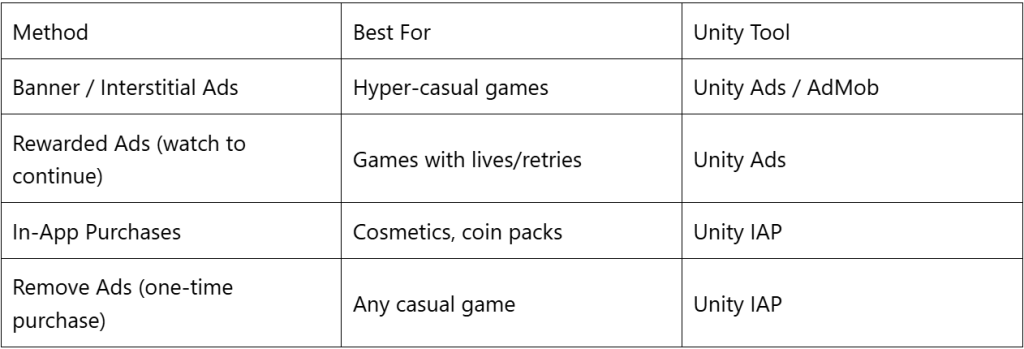
For beginners, start with Unity Ads; it's built into Unity and the easiest to integrate.
Common Mistakes to Avoid
Building a too complex a first game. Start with a one-mechanic prototype. Ship it. Learn from it.
Ignoring performance Test on a real Android device early, not just the Unity editor.
Skipping the game loop. Without a clear retry loop, players quit and never come back.
No playtesting. Show 5 people who've never seen your game. Watch them play. Say nothing. You'll learn everything.
Waiting until it's perfect to publish. Publish early, gather reviews, update often.
At Q99 Studio, we specialize in creating engaging, scalable, and performance-driven mobile games tailored to your vision.
Let’s bring your game to life. Reach out today and take the first step toward building a game players will love.


 B - 433-442, Money Plant High Street, Near Ganesh Glory, Jagatpur Road, S.G. Highway, Ahmedabad - 382470.
 11006 Kirker Ln, Richmond, TX 77407, USA


